
At Modern Tribe, accessibility is a big deal, and it’s something we care about deeply. There are, of course, legal reasons why it’s important, but the case for accessibility goes way beyond that. Organizations can maximize their reach and service by considering how design, content, and technology work together to create an enjoyable, usable, and efficient experience for as many people as possible, in as many situations as possible. Not to mention the fact that it’s just the right thing to do.
Full accessibility compliance can be a big task with many unknowns and unexpected challenges, but you can still make many meaningful improvements with very little effort. Thankfully there are several excellent tools available to quickly uncover areas of concern, as well as helpful resources to continue learning.
If you are brand new to learning about accessibility, don’t panic. Our development and quality assurance teams at Tribe have short-listed our favorite accessibility tools and resources to help you get started quickly and understand how your own website stacks up.
Tools for Testing Accessibility
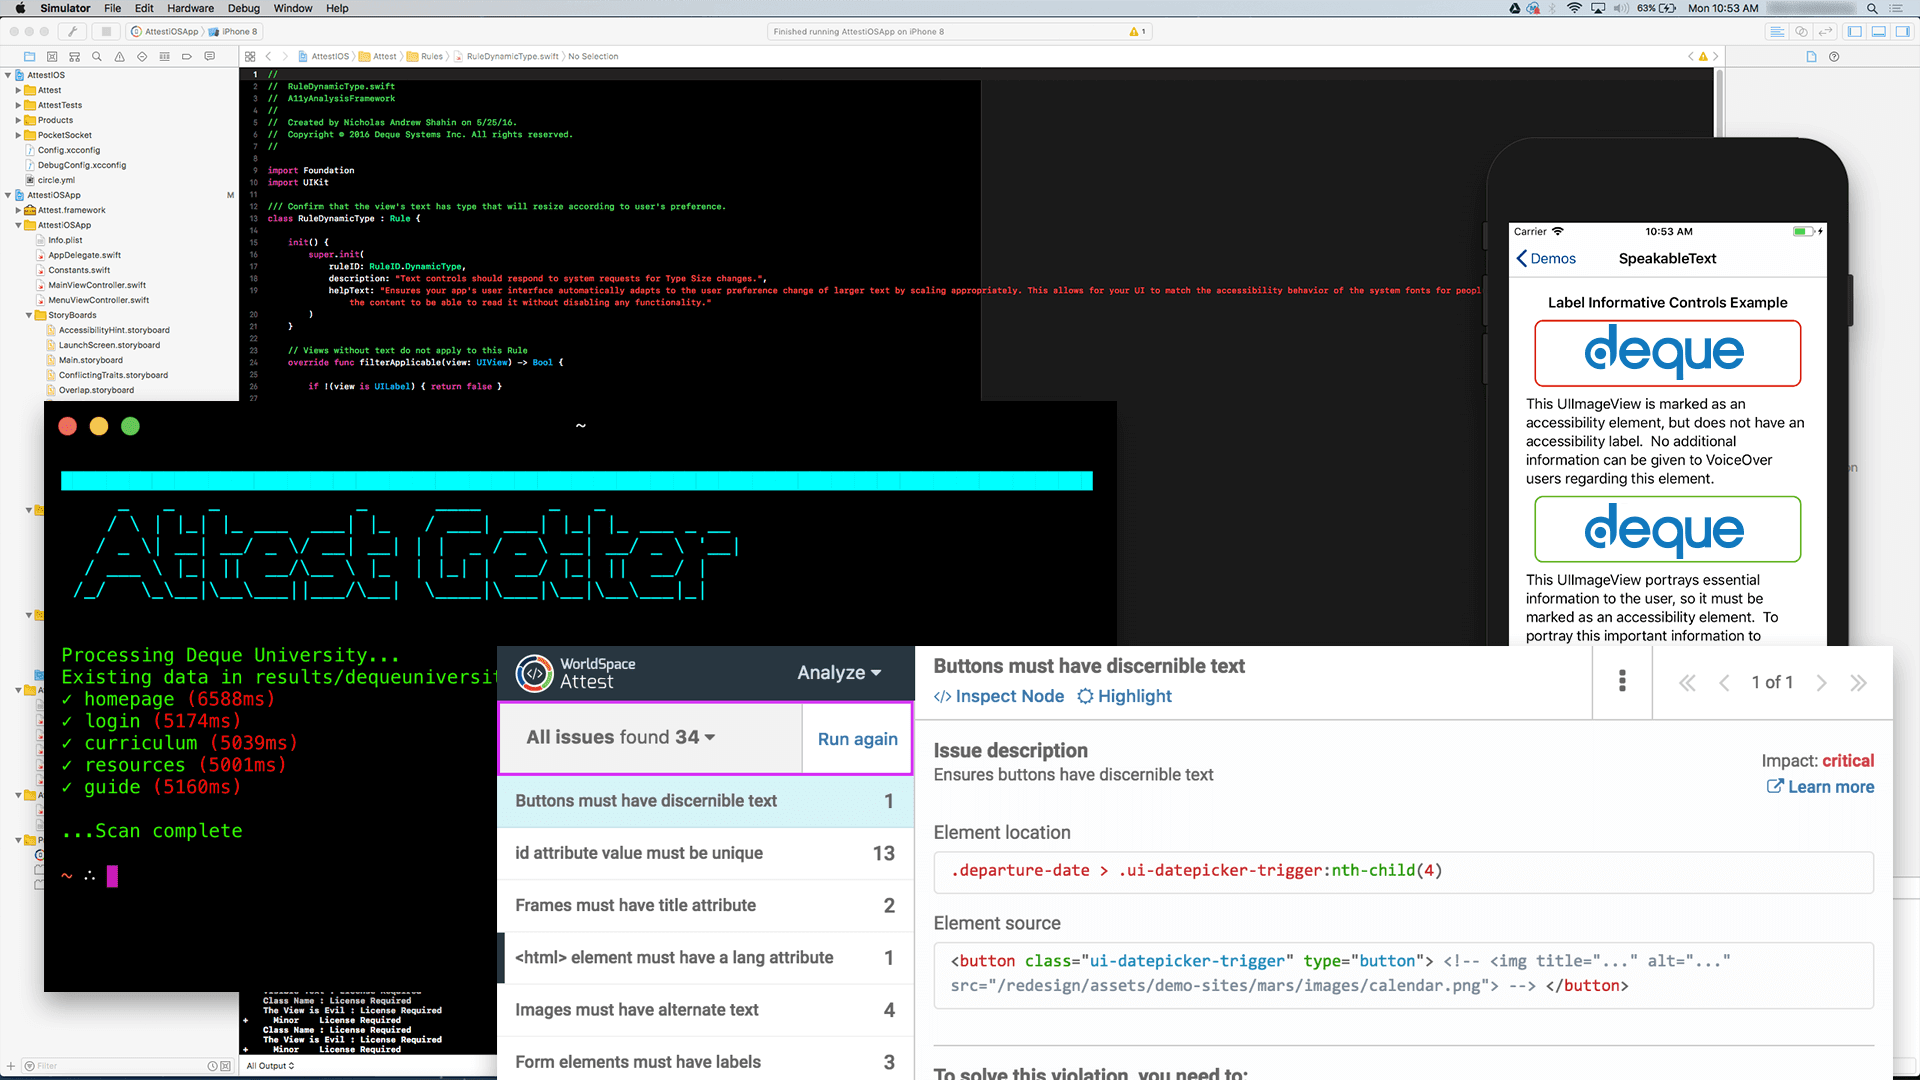
1. aXe Browser Extension
aXe (The Accessibility Engine) is our go-to tool for quick, automated accessibility audits of the HTML of individual webpages. It’s free to use and can be installed and running in your browser within minutes. aXe allows for rapid, on-the-fly accessibility testing against the WCAG 2.1 standards. This tool alone will expose the majority of HTML accessibility violations.
Getting started with aXe
- Install the Chrome or Firefox browser extension.
- Open your browser developer tools and select the aXe tab.
- Click the Analyze button, and aXe will do its thing! If the page has accessibility violations, the results will display for you to review and tab through.
- Run aXe again on each page you’d like to test.
Tips for using aXe
- Results are grouped by the type of violation, but each violation is reported individually. It is likely that you’ll see repeats of the same type of violation, as many similar elements such as menu items, links, or buttons share the same styles and attributes. This can be an easy win—just fix the source code in one place, and all the related violations should be resolved. The same principle goes for components that are found on many or all pages or page templates of your website, such as the header, navigation, and footer. Solving accessibility issues in these places is a great way to get started.
- Results are identified as Minor, Moderate, Serious, or Critical. It often makes sense to tackle critical or serious violations first, but there’s nothing wrong with going for some quick and easy wins to get your violation count down.
- aXe attempts to eliminate false positives, so you may not see violations that are being reported by other tools. This is a good thing because many other tools will display errors that are not truly violations. That being said, it’s important to use multiple tools to compare and decide which violations are actual issues and should be prioritized for resolution.
- Use the Highlight feature to easily spot the element corresponding to each violation. If you have a less technical background and don’t understand the element coding in the reports, the Highlight tool is absolutely essential to understanding where you should be looking on the page.
- For each violation, aXe provides details about which element is causing the violation and suggests how to fix it. If you’re more technically advanced, you can use the Inspect Node feature to open the Elements inspector. You can edit the HTML with the suggested fix and go back to aXe to re-analyze, immediately seeing whether the violation has been adequately addressed. If the violation doesn’t show up when you re-analyze, it means you’ve successfully resolved the issue. Well done!
If there is only one tool in your accessibility arsenal, it should be the aXe browser extension, or the WorldSpace Attest DevTools extension (next on the list!), which is made by the same developer as aXe but with a few additional features.
Helpful Links
2. Other Browser Extensions
While aXe and WorldSpace Attest DevTools are terrific automated accessibility testing tools, we suggest using at least one additional tool for comparison. Below is a list of the other browser extensions that we use to supplement Attest DevTools.

Lighthouse
Lighthouse is an open-source tool from Google that’s built right into Chrome DevTools. Simply open Chrome DevTools, click the Audits tab, select Accessibility, and run the audit. The results provide an overall accessibility score (a nice touch, we think), along with easy-to-digest results. Lighthouse uses the aXe-core library, which is the same as aXe and Attest DevTools, so the results should be consistent.
Siteimprove Accessibility Checker
Available as a free browser extension, the Siteimprove Accessibility Checker is an excellent tool with a lovely user interface. This tool provides an easy-to-understand report of each violation, along with compliance recommendations. Siteimprove also offers a premium (paid) platform to monitor the accessibility of your entire site, including content.
Wave Accessibility Evaluation Tool
Available as either a free online tool or a browser extension, the Wave Accessibility Evaluation Tool is a well-regarded automated accessibility test. Wave is very visual, with annotations directly on the website—making it very easy to locate where the accessibility violations occur on the page. It also has an Outline feature that shows the heading structure of the page, allowing you to easily see if it makes sense for a non-visual user.
Accessibility Insights for Web
Available as a free browser extension for Chrome or Microsoft Edge, Accessibility Insight for Web is developed by Microsoft and includes a light-weight FastPass, as well as a more comprehensive Assessment feature. The Assessment feature includes more than 20 steps that provide a guided accessibility pass. It’s a great tool to learn about accessibility in general while also applying what you learn to your own website.
AInspector Firefox Extension
A free browser extension for Firefox, AInspector Sidebar applies the rules from a selected ruleset to the page currently loaded in the browser. Links are provided at the element level for launching the Firefox Inspector. Settings allow you to decide how you want violations and warnings to be highlighted on the page you’re viewing to provide a visual understanding. The default view breaks down the results by Violations, Warnings, Manual Checks and Passes. This allows you to see what automated checks were completed, as well as the manual checks you should be performing and how to complete them.
3. Your Keyboard

The ability to navigate a website by using only the keyboard is a critical component of website accessibility—and fortunately it’s very easy to test. All you need is your keyboard.
Load your homepage and begin navigating the website using the tab key to move forward and shift+tab to move backward through links and interactive elements. Here’s what you’re checking for:
- All interactive elements should have a clear focus style that shows which element is currently selected.
- All hidden elements (such as sub-menus, accordions, and tooltips) should be easy to open with the tab or enter keys.
- Forms should be able to be completed with the keyboard only, using the spacebar to select checkboxes and arrow keys to change options for dropdowns and radios.
- Sliders should be able to change with the arrow keys.
- Dialog boxes should be able to close with the escape key.
- The page should be able to scroll up and down with the arrow and spacebar/shift+spacebar keys.
- Some websites go even further and introduce custom keyboard shortcuts, in which case a legend should always be provided.
The general rule? A user should be able to do everything on your website with a keyboard alone—simply and without confusion. In other words, a keyboard-only user’s experience should mirror that of a mouse user.
Before you get started with your manual keyboard tests, make sure your computer is configured to navigate using the keyboard. If you’re using a Mac, this article explains the settings you’ll need to adjust on your computer and in your individual browsers to allow proper keyboard controls.
4. Screen Reader
Browsing your website with a screen reader is a great way to ensure that all of your content is accessible using assistive screen reader software, and that the site can be navigated and understood by users with limited or no visibility. Although it takes an experienced screen reader user to provide accurate feedback on how accessible a website is to them, anyone can use a screen reader to get a sense of how well the website works and spot obvious areas for improvement.
There are a few major screen reader tools worth knowing about.
- For Windows: Narrator (free – built in to Windows), NVDA (free – download), and Jaws (paid – download)
- For Mac OSX: VoiceOver (free – built in to Mac OSX)
We suggest using both VoiceOver for Mac and NVDA for Windows to test on both operating systems. If you have only one operating system available, start with whichever you have available. We prefer NVDA over Narrator because it’s currently used by a much larger population.
To get the most out of screen reader testing, close your eyes during the process. You can be influenced by what you see, and it’s very easy for your brain to automatically fall back on a visual understanding that a screen reader user doesn’t have. When you don’t have a visual of the site, you’re forced to rely on your hearing. This test makes you more aware of any shortcomings. Screen readers most commonly navigate websites through the heading structure, landmarks, and the menus. Read the guides below to learn how to navigate by those features.
Helpful Links
- To get started with NVDA, we suggest reviewing WebAIM’s guide to Using NVDA to Evaluate Web Accessibility.
- To get started with VoiceOver, check out WebAIM’s guide to Using VoiceOver to Evaluate Web Accessibility.
5. Evaluating PDF Accessibility
All PDF documents on your website should also be accessible. The link should certainly be accessible, but the document itself must conform to the same accessibility standards. Here are some tools for testing the accessibility of your PDF documents:
- CommonLook PDF Validator
- Adobe Acrobat Pro Accessibility Checker
- Microsoft Office Accessibility Checker
- Grackle Docs Add-on for Google Docs
Resources for Learning About Accessibility
1. a11yweekly
Our absolute favorite resource is a weekly newsletter called a11yweekly. Every week, subscribers receive a simple email newsletter with a curated list of the top posts in the accessibility world. It’s the most convenient way to stay up to date on everything from general trends and news, to technical how-to’s and expert insights. If you’re not already subscribed, stop reading this post and sign up before you move on.
2. WebAIM’s WCAG 2.0 Checklist
Evaluating a website for accessibility conformance is much easier with an understanding of the guidelines that you will be striving to meet. Sure, the automated testing tools compare against the guidelines and some even provide them grouped for easy understanding, but a manual review of the guidelines is a good idea and a great reference when you need more information. The full Web Content Accessibility Guidelines (WCAG) 2.1 by W3C are very comprehensive. We suggest using WebAIM’s WCAG 2.0 Checklist, which significantly simplifies the language and supporting materials, making it much easier to review and understand. WebAIM also has a Section 508 Checklist.
3. VoxMedia’s Accessibility Guidelines Checklist
This accessibility checklist by VoxMedia is the best example of a simplified overview of accessibility considerations broken down for each role (Design, Engineering, Project Management, Quality Assurance, and Editorial). It is not a comprehensive list like WebAIM’s WCAG checklist, but if that one is too overwhelming, this is a great start for an initial accessibility evaluation.
4. Accessibility Fundamentals from Google Developers
Google’s Web Fundamentals Guides include an overview of Accessibility. The guide answers the question ‘what is accessibility?’ and covers web content accessibility guidelines, understanding user diversity, how to conduct an accessibility review, accessibility for teams, and more. Written by some of Google’s own developers, the guides are very easy to understand.
5. Blogs
If you’re still looking for more, here are a few of our favorite Web Accessibility blogs.
That’s a good start … but it doesn’t end there.
The tools and techniques we’ve listed above are a great start and will help uncover a significant number of accessibility issues. If we had to throw out a number, we’d estimate 60% of your website’s violations.
How do you catch the other 40%?
With more manual testing. Lots more. Although automated tools may not recognize a violation, real-world users may still have difficulty using certain elements of your site.
Design and content play a huge role in accessibility, but automated tools aren’t able to evaluate these factors effectively. Here are some questions to consider:
- Is your content clear and understandable, or complicated and overly wordy?
- Does your design really have enough color contrast and spacing?
- Are navigation, searching, and key user paths (such as making a purchase) intuitive and easy to follow?
- Is your alt-text detailed enough?
- Are third-party integrations and embeds also accessible?
- Do links open in new tabs?
These are just some of the many questions you should be asking if you want to make your website truly accessible to all.
Accessibility is a journey, and there’s always room for improvement. Jump in and get started with these tools to get a sense of how accessible your website is. Knowing where you stand now is the first step. Even beginners can go from zero to a strong understanding of accessibility very quickly, and it all starts with the tools and resources we’ve shared with you here.